
Truck Tire Valve Stem Replacement: How-To
- 1 day ago
- 11 min read
A leaking truck valve stem can leave a rig parked when the tire itself looks fine. In many cases, you won't need a $100 bead breaker. A $25 to $30 valve stem kit or a pair of thin pliers may handle the job, but high-pressure truck tires demand care.
We'll show you how to check the part, remove the old stem, install the new one, and test the seal. If the wheel is damaged or the tire still holds pressure, our big truck tire repair guide can help you decide what to inspect next.
Table of Contents
Step 1: Confirm the Correct Truck Valve Stem and Gather Tools
Yes, the right part comes first. A truck tire valve stem replacement fails quickly when the stem does not match the rim hole, wheel type, or pressure need.
Start by identifying the wheel. Check whether it uses a standard snap-in stem or a metal clamp-in stem. Look at the rim hole size and the old stem's shape. Commercial wheels may use larger holes than passenger wheels. Some aluminum truck wheels also need a bent or extended stem so the chuck can reach it.
Do not guess from the tire size alone. Compare the old stem with the replacement. Check the stem length, angle, mounting style, and pressure rating. A straight stem for a small rim hole may not fit a commercial wheel with a larger opening.
Buy quality EPDM-rubber valve stems that match the wheel and its pressure needs. Treat the stem's specifications as product-specific, not as a setting for every truck. Match the stem to the wheel and its pressure needs.
Inspect the material and maker's specifications before fitting a replacement.
Gather the tools before you deflate the tire:
A valve core removal tool.
A insertion tool , if you plan to use a kit.
Thin, blunt needle-nose pliers for the method.
A knife for cutting the old valve stem about halfway.
A small amount of lubricant.
Protective equipment.
An unattached air hose for checking air flow.
A way to check the seal.
A valve tool can help with core removal. Use light pressure. You want to clean the threads, not cut into the valve.
We also suggest keeping spare quality stems and a basic kit in a fleet service box. That small habit can help during a roadside inspection or a depot handoff. It won't replace a trained tire technician when the wheel or bead has a problem.
Key Takeaway:Match the stem to the rim hole and pressure rating before removing air. Choose a quality replacement, but the wheel maker's fit still controls.
Step 2: Deflate the Tire Completely and Remove the Old Stem
Truck tire valve stem replacement starts with a fully deflated tire. Never pull or cut a stem while the tire still contains pressure.
Park on firm, level ground. Set the parking brake and secure the vehicle against movement. Keep people clear of the wheel. If the tire is on a commercial truck, follow your fleet's tire service rules before you begin.
Remove the valve cap. Then use the core tool to turn the valve core counterclockwise. Let the air leave on its own. Do not rely on a cap to hold pressure. A cap may slow a leak, but it is not a pressure seal.
Wait until no air exits. Pressing the valve pin can confirm that pressure is gone, but keep your face and hands away from the opening. If air continues to rush out, stop. The tire is not ready for stem work.
Some repairs can happen with the tire still on the wheel. That approach works best when you can turn the valve sideways and reach the base. It may not work on every aluminum wheel or tight rim design.
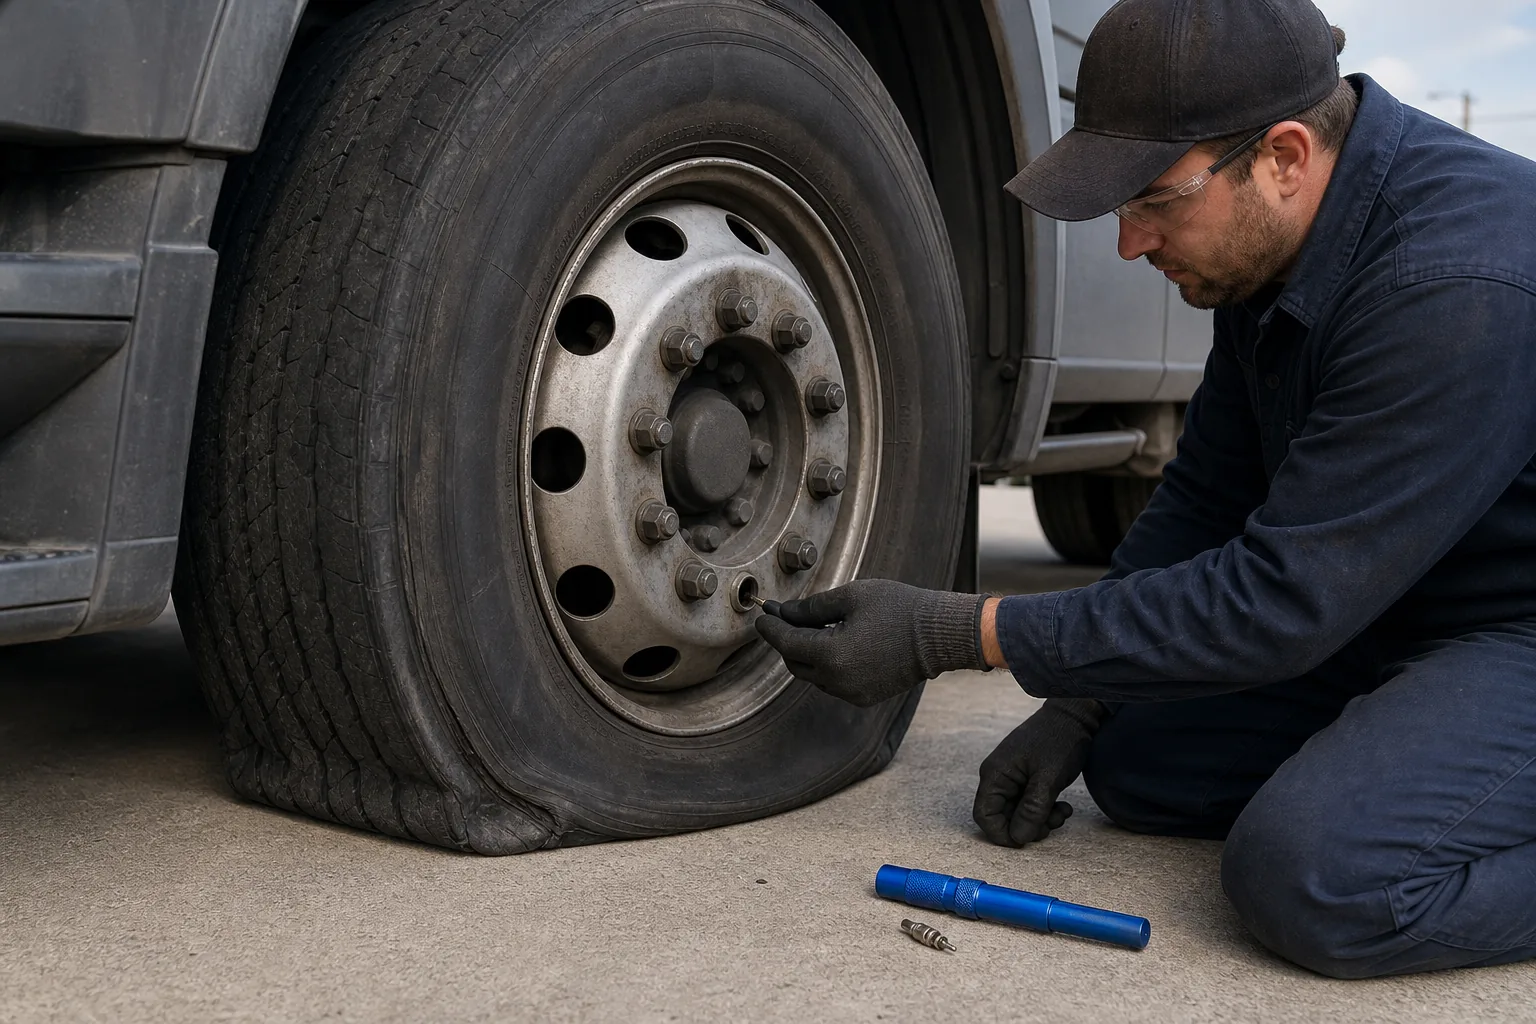
Remove the old stem with a hook tool
Push the old stem slightly to one side. Slide the hook into the rim opening from the outside. Turn the hook so it catches the stem base, then pull it out with steady force.
Try to keep the old stem in one piece. If a piece falls inside the tire, remove it before inflation. A loose rubber chunk may not cause an immediate issue, but leaving debris inside the tire is poor shop practice.
Do not pry against the rim edge with a metal tool. A scratch can become a leak path at the bead or valve hole. Protect the wheel with a smooth tool and keep the hook aligned with the opening.
Remove the old stem with pliers
If you don't have a hook tool, cut the old stem about halfway up with a knife. Pull the cut section toward the opening. Then use thin, blunt pliers to grip the remaining stem near its brass core.
Work the pliers around the rubber instead of crushing the rim. The jaws should be narrow enough to enter the opening, but blunt enough to avoid tearing the wheel or gouging the stem seat.
The pliers method has a limit. You need enough room to turn the valve sideways. If the valve cannot move into that position, stop forcing it. A dedicated insertion tool or professional tire service is safer.
At this milestone, the tire is fully empty and the old stem is out. Inspect the rim hole before you choose the installation method.
Step 3: Choose a Pliers, Valve-Tool, or Bead-Breaking Method
Yes, you have three workable paths. Choose the method that gives you control without bending the stem or marking the wheel.
The outside-tool method is often the best balance for a normal snap-in stem. Research reviewed for this article found a valve stem kit with removal and insertion pieces. It also found a separate bead breaker. The outside tool may be enough when the valve can be reached from outside.
A typical kit has a removal end and a threaded insertion piece. Push the removal end in at an angle. Catch the base. Pull the stem through the hole. For installation, place the guide over the valve hole and pull the lubricated stem into its seat.
Use the tool with care on steel wheels. One video source reports that a tool slipped away from the hole and damaged its plastic body. That is a useful warning. Keep the guide centered before you apply force.
Here is a short visual reference for the outside-tool approach:
When thin pliers make sense
Use thin, blunt needle-nose pliers when the valve can turn sideways and the rim gives you room to work. Grip the stem near its center. Push the rubber through the hole in small movements.
Do not use pliers with sharp teeth. They can cut the stem before the bead seats. They can also slip and scratch an aluminum rim. If the pliers need extreme force, change methods rather than adding force.
This method avoids a special kit, but it takes more feel. A new stem may resist as the rubber lip passes through the rim. Apply a small amount of lubricant to the rim area before inserting a tool, while some manual methods rely on a clean, dry grip. Follow the instructions for the stem and tool you have.
When to break the bead
Choose bead breaking when the valve hole is hard to reach, the rim blocks outside access, or the stem must be pushed from inside. A bead breaker separates the tire bead from the rim at the valve area. You can then insert the new stem from inside and reseat the bead.
Some people use a rubber mallet to loosen the bead. We don't recommend striking a mounted truck tire as a casual shortcut. Commercial tires have higher pressure and more stored energy than small tires. Use equipment made for the wheel, or have a qualified tire technician handle the bead.
Bead work also adds another task. After the stem goes in, the bead must seal again before inflation. If the bead won't seat, stop and get help. Don't keep adding air while standing beside the sidewall.
Equipment listings can help you compare the type of equipment involved, but product listings don't replace the wheel maker's service instructions.
Our decision rule is simple: use an outside tool when access is clear, use blunt pliers only when the valve can turn freely, and leave bead work to a trained tire service provider when the setup is uncertain.
Step 4: Lubricate, Align, and Seat the New Valve Stem
Truck tire valve stem replacement is only complete when the rubber base sits flat against the rim. A stem that looks installed can still leak if its lip is folded or twisted.
Clean the rim hole first. Remove loose rust, old rubber, and dirt. Don't enlarge the hole.
Apply a small amount of lubricant to the rim area before inserting the tool. A lubricant reduces friction as the rubber lip passes through the hole. Avoid products that can harm rubber or leave the wheel surface unsuitable for later work. If you're unsure, use the lubricant named in the stem or tire service instructions.
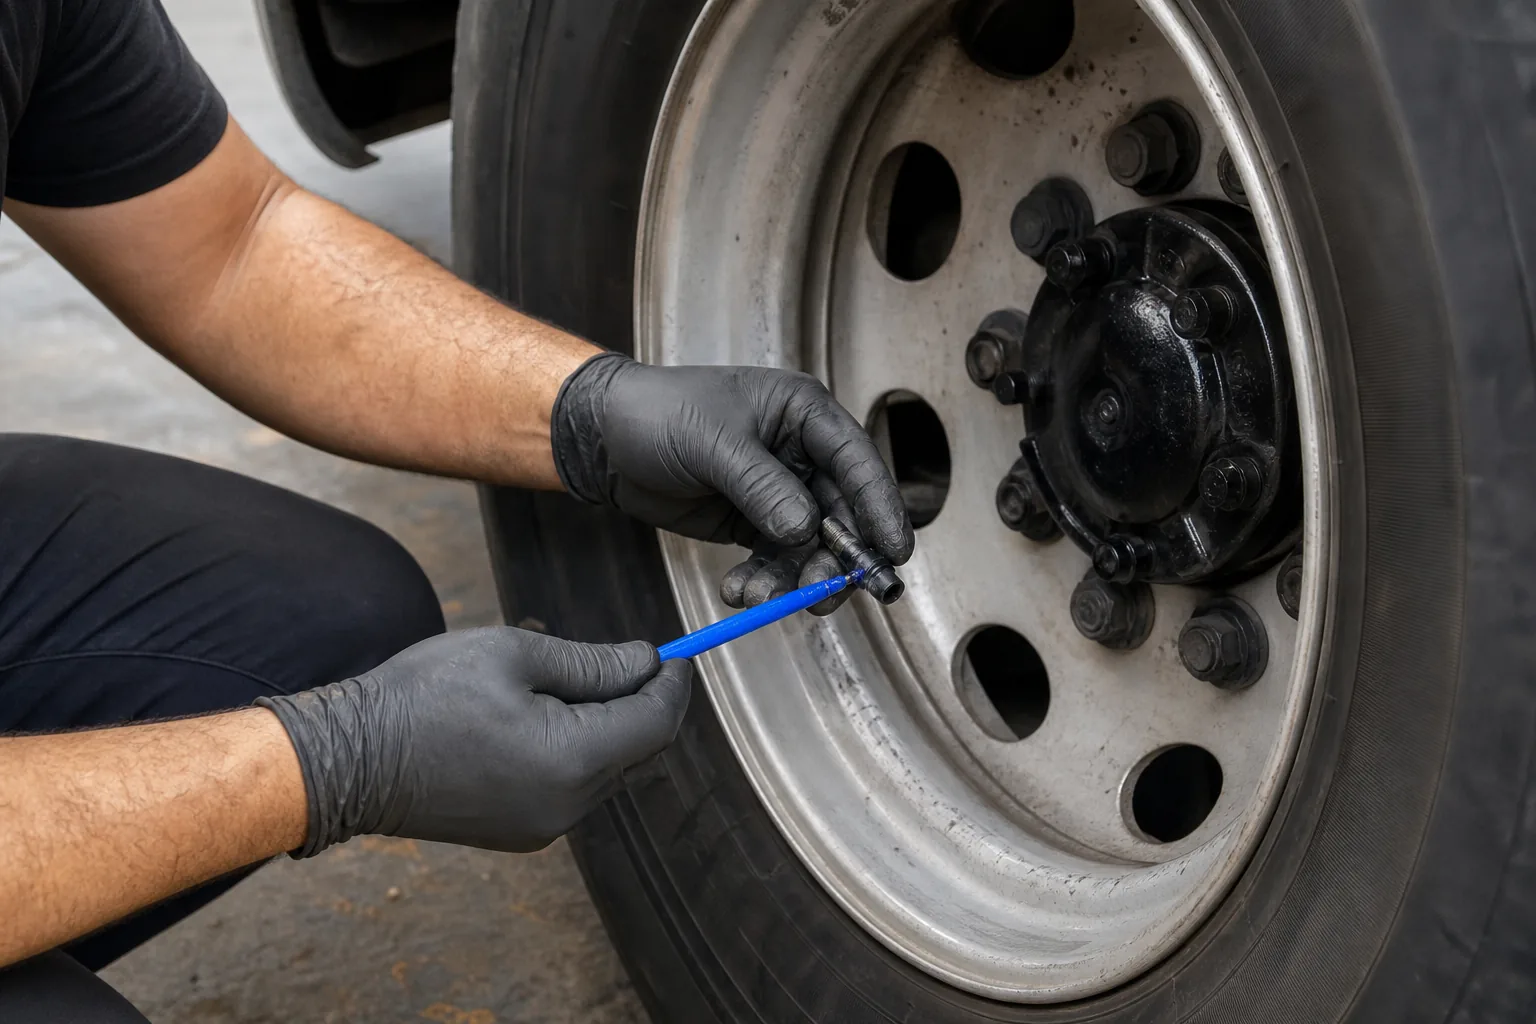
Install with an insertion tool
Place the insertion guide directly above the rim hole. Thread the new stem onto the tool if the kit uses a threaded connection. Make sure the stem points in the right direction before you pull.
Push the stem into the guide in one firm motion. Then pull back until the rubber base snaps into place. Reset the tool quickly if the stem slips, and pull back to lock the valve stem in place. Do not keep pulling at an angle, since that can stretch the rubber or leave one side unseated.
Remove the tool and look at the base from both sides. The rubber should form an even lip around the hole. The stem should stand straight, unless you selected an angled stem for that wheel.
Install with thin pliers
Grip the new stem near the brass center. Put the tip into the rim hole. Work the rubber lip through the opening while keeping the stem aligned.
Use your fingers to check the inner edge after the stem passes through. The back lip must flare out against the rim. If it folds under itself, remove the stem and start again.
Don't coat the plier jaws with lubricant. A slippery grip can make the tool twist. Keep the stem clean where the jaws hold it.
Truck wheels can have a long stem, a bend, or an extension. Check that the cap can be fitted and removed without striking the wheel. A cap also needs a clean thread. Cross-threading the cap can damage the stem's outside threads.
Pro Tip:After seating the stem, push it gently from different sides. It should stay planted while the base remains even around the rim hole.
If the stem will not seat with moderate force, stop. A wrong part, a damaged rim hole, or poor tool alignment is more likely than a need for greater force.
Step 5: Reinstall the Core, Inflate, and Test for Leaks
Yes, the final check decides if the repair is safe to return to service. Reinstall the core only after the new stem is seated.
Inspect the core. If its spring, pin, or seal looks damaged, replace it with the correct core. Thread it into the stem by hand first. Then tighten it with the core tool. Do not guess at a torque value. Use the stem or wheel maker's instructions when a torque specification applies.
Attach the air line from a safe position. Keep your body away from the sidewall and the bead area. Inflate in stages while watching the stem base. If the rubber lifts, twists, or leaks loudly, stop and release the air before adjusting anything.
Use the truck's specified cold inflation pressure. The correct number depends on the tire, load, wheel, and fleet setup. Our truck tire pressure guide for drivers explains how load and temperature affect pressure, which helps prevent a good stem repair from being followed by a poor pressure check.
Test the seal with a liquid made for finding leaks. Coat these areas:
The stem base where rubber meets the rim.
The valve core.
The outer stem threads and cap area.
The bead near the valve if the bead was broken.
Watch for steady bubbles. A few moving bubbles from the solution itself don't prove a leak. Clean the area, apply the solution again, and watch for growth.
If the base leaks, deflate the tire and reseat or replace the stem. Tightening the valve cap won't fix a bad base seal. If the core leaks, remove it and check the core seat for dirt or damaged threads.
Once the seal passes, fit the cap. The cap helps keep dirt and moisture away from the valve core. A truck tire service video also warns that moisture can freeze inside an uncapped valve and cause a leak. Give the cap a firm hand twist, but don't force it.
Record the repair in your fleet maintenance program if the vehicle is managed as part of a fleet. Note the wheel position, stem type, and pressure check. That record helps the next driver or technician spot repeat leaks.
Recheck the tire after the vehicle has sat. A slow leak may not show during a short test. If pressure drops, the problem may be the rim, bead, tire, core, or stem base rather than the stem alone.
Key Takeaway:Inflate in stages, test the stem base and core, fit the cap, and recheck pressure before the truck returns to work.
Safety Checks Before You Return the Truck to Work
Online instructions often skip the hard part: safety limits. The research reviewed for this article found no complete coverage of safety precautions, torque data, or time estimates across the collected entries. That gap matters more on a commercial wheel.
Stop the job and use expert help when:
The tire still has pressure after core removal.
The rim is cracked, bent, deeply corroded, or badly scratched.
The valve hole does not match the replacement stem.
The bead will not separate or reseat.
The tire has sidewall damage or an unknown repair history.
You need to work near a dual-wheel assembly without the right access.
The stem leaks again after correct seating.
For a commercial truck in Dallas-Fort Worth, The Tire Specialist can provide on-site tire replacement, repair, and roadside help. We can inspect the full wheel area when a leaking valve turns out to be a symptom of a wider tire or rim issue.
That is often the better choice when downtime costs more than a small part. We bring the work to the truck, so a fleet manager doesn't need to move a disabled vehicle through traffic.
FAQ
Can I replace a truck tire valve stem without removing the tire?
Yes, you can replace some truck valve stems without removing the tire from the rim. A suitable tool or thin blunt pliers may work when the valve can turn sideways and the rim gives you room. The method may not fit every aluminum wheel. Stop if the tool slips or the stem needs heavy force.
What type of valve stem should I use for a truck tire?
Use a stem that matches the rim hole, wheel style, angle, length, and pressure rating. Choose a replacement stem suited to the wheel and tire. Commercial wheels may need metal clamp-in stems or larger openings, so confirm the fit first.
Do I need a bead breaker for truck tire valve stem replacement?
No, you don't always need a bead breaker for truck tire valve stem replacement. A suitable tool may handle a reachable stem. Use bead-breaking only when outside access is blocked or the stem must be pushed from inside. Bead work adds risk, so trained tire service is the safer choice for many commercial wheels.
How do I know if the new valve stem is seated?
The new valve stem is seated when its rubber base sits evenly against the rim hole and stays in place under gentle hand pressure. Inflate in stages, then check the area around the base for bubbles. Growing bubbles mean the stem is not sealed. Deflate before correcting the problem.
Why is my new truck valve stem still leaking?
A new truck valve stem may leak because the wrong size was fitted, the rubber lip folded, the rim hole is damaged, or the valve core is faulty. Check the base first, then the core and cap area. If the leak remains after correct installation, have the wheel and tire inspected by The Tire Specialist.
Conclusion
A hook-tool kit is usually the sensible first choice for a reachable valve stem, while thin blunt pliers can work in a tight budget setup. Match the stem carefully, deflate fully, protect the rim, and test the seal before the truck moves. If the wheel needs bead work or the leak returns, contact The Tire Specialist's semi-truck tire maintenance team for on-site help in the Dallas-Fort Worth area.


Comments